24 LED Larson Scanner

HuwR
Forum AdministratorIntroduction
The Larson Scanner is one of those timeless electronics projects — the hypnotic red sweep made famous by the Cylons in Battlestar Galactica and KITT in Knight Rider. Both were created by Glen A. Larson, and both inspired generations of makers to recreate that iconic effect.
This build brings the classic scanner into the Raspberry Pi era using a custom PCB, 24 LEDs, and a dash of Charlieplexing magic.
Instead of dedicating one GPIO pin per LED, we’ll use Charlieplexing, a clever wiring technique that allows control of n2−n LEDs with only n pins. With 6 GPIO pins, we can drive up to 30 LEDs — more than enough for our 24‑LED scanner.
Hardware Overview
PCB Layout
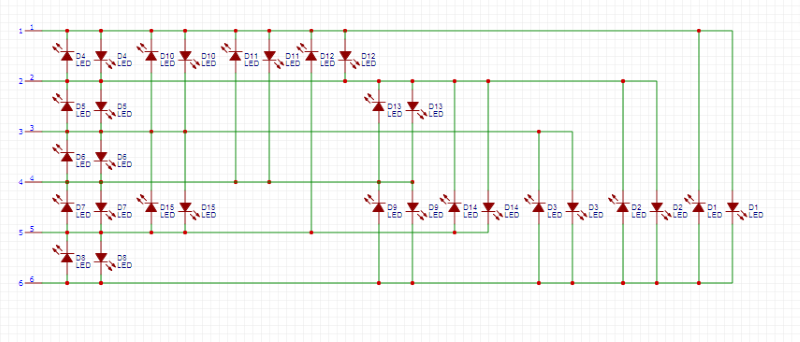
The board was designed in Sprint‑Layout and arranges all 24 LEDs in a clean, straight line for that unmistakable scanner look

Fabrication
The PCB was etched and soldered by hand. Because Charlieplexing relies on precise pin‑to‑pin relationships, careful soldering is essential


Charlieplexing Setup
Charlieplexing lets you control up to n2−n LEDs using only n GPIO pins. With 6 pins, the Pi can theoretically drive 30 LEDs — plenty for this project’s 24‑LED array.
Pins used: GPIO 13, 16, 19, 20, 21, 26
Each LED is defined by a pair of pins: one set HIGH, one set LOW, and the rest left as inputs.
Software Implementation
The scanner is driven by a Python script using the RPi.GPIO library.
sudo apt-get update
sudo apt-get install rpi.gpio
Key Concepts
-
Pin Resetting: Before lighting each LED, all pins are set to input mode to prevent ghosting.
-
Lighting an LED: One pin goes HIGH, another LOW, the rest stay as inputs.
-
Sweep Effect: LEDs are lit in sequence, then reversed, creating the classic back‑and‑forth motion.
Core Script
The page includes the full Python script that:
-
Builds the Charlieplex LED matrix
-
Defines the sweep order
-
Supports an optional repeat count via
-l -
Monitors GPIO pin 5 for an external stop signal
-
Cleans up GPIO state on exit
import sys, getopt
# Import the module that runs the GPIO pins
import RPi.GPIO as gpio
# Import the sleep function for pausing
from time import sleep
# set the GPIO pins to BOARD mode
gpio.setmode(gpio.BCM)
#If an argument is passed then set the repeat counter
repeatcount=0
myopts, args = getopt.getopt(sys.argv[1:],"l:")
for o, a in myopts:
    if o == '-l':
        repeatcount=int(a)
# This function lights a specific LED. The led variable input is a 2 item
# list, each item representing a pin
def lightLED(led):
#First clear the pins, by setting them all to input
    for pin in charliePins:
        gpio.setup(pin,gpio.IN)
#Now set up the first pin for HIGH OUTPUT
    gpio.setup(led[0],gpio.OUT)
    gpio.output(led[0],gpio.HIGH)
#Now set up the second pin for LOW OUTPUT
    gpio.setup(led[1],gpio.OUT)
    gpio.output(led[1],gpio.LOW)
# Define the array of pins used as leads
charliePins=[13,16,19,20,21,26]
# Define the order for triggering the LEDs
charlieOrder=[1,0,3,2,5,4,7,6,9,8,11,10,13,12,15,14,17,16,19,18,21,20,23,22]
# Build the array of LEDs by cycling through the pins and creating the pairs.
# It has the disadvantage of not making them in order for larger sets of
# pairs, but is easier to maintain, IMO.
charlieLEDS=[]
for i in range(0,len(charliePins)-1):
    for j in range(i+1,len(charliePins)):
        charlieLEDS.append([charliePins[i],charliePins[j]])
        charlieLEDS.append([charliePins[j],charliePins[i]])
#Run the code over and over and over again
try:
    counter = 0
    while 1:
        if repeatcount > 0:
            counter=counter+1
        for led in charlieOrder:
            lightLED(charlieLEDS[led])
            sleep(.042)
        if repeatcount > 0:
            counter=counter+1
        for led in reversed(charlieOrder):
            lightLED(charlieLEDS[led])
            sleep(.042)
        if counter > repeatcount-1:
            if repeatcount>0:
                raise ValueError('limit reached')
#check pin 5 to see if we need to quit
#pin 5 can be set high by another script to trigger the scanner to stop.gpio.setwarnings(False)
        gpio.setup(5,gpio.IN)
        if gpio.input(5):
            quit()
except KeyboardInterrupt:
        print 'interrupted'
except ValueError as err:
        print(err.args)
finally:
        gpio.cleanup()
Advanced Features
-
Automatic Stop: A separate script can set GPIO pin 5 HIGH to stop the scanner after the next sweep.
Repeat Count: Use
-lto limit the number of sweeps.-
Safety: Always use resistors to protect your LEDs from overcurrent.
import RPi.GPIO as gpio
gpio.setwarnings(False)
gpio.setmode(gpio.BCM)
gpio.setup(5,gpio.OUT)
gpio.output(5,gpio.HIGH)
Final Build
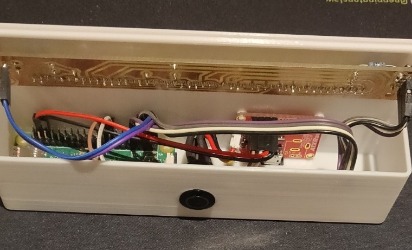
The finished scanner runs on a Raspberry Pi Zero 2 W and produces a smooth, glowing red sweep across all 24 LEDs. The project is housed in a custom 3D‑printed case designed specifically for this build.
A perfect blend of retro sci‑fi charm, modern microcontrollers, and maker‑spirit.
.

And off it goes ![]()
How I got the Forum working here!
HuwR
Forum AdministratorInstalling .NET 8
I wanted to make sure my Pi was completely updated with all the latest software so I ran two commands to ake sure.
sudo apt update
sudo apt full-upgrade
None of that is strictly necessary but I like to be up to date before installing stuff.
Now I can install .NET 8.
sudo apt-get update && \
sudo apt-get install -y dotnet-sdk-8.0
sudo apt-get update && \
sudo apt-get install -y aspnetcore-runtime-8.0
sudo apt-get install -y dotnet-runtime-8.0
And that should be it for .NET! Next we will install a database server for the Forum, I chose to use MariaDB.
Installing a Database Server
Let’s make our new server more usable by installing MariaDB:
sudo apt install mariadb-serverIt can't get easier than that! A SQL client is included with the server installation, so you can connect to the database and check that it is working:
sudo mariadb
Before we leave the client, create a new database (more on this later) and a user for it. It’s a good practice to not use the root user when consuming the database from your applications. Here’s what you need to execute:
CREATE DATABASE snitzforums;

CREATE USER 'admin'@'%' IDENTIFIED BY 'Password123!';

GRANT ALL PRIVILEGES ON snitzforums.* TO 'admin'@'%';
Now you can leave the SQL client:
quit
We’ll connect remotely to the database using the above user later.
Securing the Database Server
You can use the database in its current state, but it’s always a good idea to secure the server. MariaDB includes a tool that easies this process:
sudo mariadb-secure-installation
You’ll be prompted with the root password which by default is empty, so just press enter. The tool asks you questions as you go. Feel free to configure your database server as you wish. For reference, here’s how I answered the questions:
NOTE: RUNNING ALL PARTS OF THIS SCRIPT IS RECOMMENDED FOR ALL MariaDB
      SERVERS IN PRODUCTION USE!  PLEASE READ EACH STEP CAREFULLY!

In order to log into MariaDB to secure it, we'll need the current
password for the root user. If you've just installed MariaDB, and
haven't set the root password yet, you should just press enter here.

Enter current password for root (enter for none):
OK, successfully used password, moving on...

 Setting the root password or using the unix_socket ensures that nobody
can log into the MariaDB root user without the proper authorisation.

You already have your root account protected, so you can safely answer 'n'.

 Switch to unix_socket authentication [Y/n] n

 ... skipping.

You already have your root account protected, so you can safely answer 'n'.

Change the root password? [Y/n] Y

New password:
Re-enter new password:
Password updated successfully!
Reloading privilege tables..

 ... Success!

 By default, a MariaDB installation has an anonymous user, allowing anyone
to log into MariaDB without having to have a user account created for
them.  This is intended only for testing, and to make the installation
go a bit smoother.  You should remove them before moving into a
production environment.

 Remove anonymous users? [Y/n] Y

 ... Success!

 Normally, root should only be allowed to connect from 'localhost'.  This
ensures that someone cannot guess at the root password from the network.

Disallow root login remotely? [Y/n] Y
 ... Success!

 By default, MariaDB comes with a database named 'test' that anyone can
access.  This is also intended only for testing, and should be removed
before moving into a production environment.

Remove test database and access to it? [Y/n] Y
 - Dropping test database...
 ... Success!
 - Removing privileges on test database...
 ... Success!

Reloading the privilege tables will ensure that all changes made so far
will take effect immediately.

Reload privilege tables now? [Y/n] Y
 ... Success!

 Cleaning up...

All done!  If you've completed all of the above steps, your MariaDB
installation should now be secure.

Thanks for using MariaDB!
Publish site and copy it to the Pi
To test this all out, I move back to my local Windows machine where I have set up a test forum. If I go into that website I can publish it with the command
dotnet publish -c Release -o .\releaseThis publishes the website with the Release configuration and in a directory called "release" in the current directory. Navigate into the release directory through Windows Explorer and make a single zip file of everything in there. This is to help with copying everything over. I tried copying all the individual files over and it takes forever with all the thousands of little files Umbraco has. Copying a single zip is, well, pretty zippy.
Now I can copy the zip over to the Pi. In order to do so I switch back to my ssh session on the Pi and make a new directory in my home directory called "snitz". Then I can do the copy from Windows using scp:
scp release.zip huw@deskpi.local:/home/huw/snitz/release.zipOn the Pi, I need to do a one-time install of a package called unzip, you can guess what that's for ![]() .
.
sudo apt-get install unzipAfter that is done we can go to the folder on the Pi where we copied release.zip, extract all the files and delete the zip file:
unzip release.zip
rm release.zip
Before we run the site we need to edit the appsettings.json to configure a few things first. Open the file using your prefered editor. The contents of the file are below with details of what you need to chage.
{
  "ConnectionStrings": {
    "SnitzConnection": "Server=192.168.0.118;Database=snitzforum;Uid=admin;Pwd=Password123!;Pooling=True;Connection Timeout=30",
    "HangfireConnection": "Server=192.168.0.118;Database=snitzforum;User=admin;Password=Password123!;Pooling=True;Connection Timeout=30",
    "DBProvider": "mysql"
  },
  "SnitzForums": {
    "forumTablePrefix": "FORUM_",
    "memberTablePrefix": "FORUM_",
    "strVersion": "7.0.0",
    "LanguageConnectionString": "SnitzConnection",
    "strForumUrl": "https://localhost:5001/",
    "strForumDescription": "Development site for .NET Core port of Snitz™ Forums 2000",
    "strForumTitle": "MediaWizards Forums",
    "strCopyright": "{0} H Reddick",
    "strUniqueId": "SnitzCore00",
    "excludeBots": "googlebot,bing,duckduck,yahoo,spider,bot,facebook,netEstate,Not-A.Brand,barkrowler",
    "SupportedLanguages": [ "en", "no", "fa" ]
  },
  "MailSettings": {
    "From": "huw@reddick.co.uk",
    "UserName": "",
    "Password": "",
    "RequireLogin": false,
    "SmtpServer": "localhost",
    "Port": 25,
    "SecureSocketOptions": "StartTls"
  },
  "IdentityOptions": {
    "Password": {
      "RequiredLength": 8,
      "RequireDigit": true,
      "RequiredUniqueChars": 4,
      "RequireLowercase": true,
      "RequireNonAlphanumeric": false,
      "RequireUppercase": true
    }
  },
  .... other sections removed for clarity

  "AllowedHosts": "*"
}
I made sure to test that the site runs. My project was called "SnitzForum" so in the release folder there's a SnitzForum.dll, which is the main entry point for the app. In order to run the site, run the following command:
dotnet SnitzForum.dllThis will give absolutely no output on the command line (unless any errors occur), so open a second ssh session into the Pi and try to make sure something was running. By default, the site runs on port 5000 so I can see if there's a response using curl:
curl http://localhost:5000This resulted in a bunch of HTML flashing on the screen. So far so good ![]() .
.
Run it as a service
Now that we've confirmed the site can run, tap CTRL+C on the first ssh session to stop it from running. I want to make sure the site starts every time the Pi reboots, so I followed the guide by Niels Swimberghe to do so. Create a new text file called SnitzForum.service using nano or vi:
nano SnitzForum.serviceThe content of the file is as follows, I'll explain below what you would want to change:
[Unit]
Description=ASP.NET Core web template

[Service]
# will set the Current Working Directory (CWD)
WorkingDirectory=/home/sebastiaan/testlive
# systemd will run this executable to start the service
# if /usr/bin/dotnet doesn't work, use `which dotnet` to find correct dotnet executable path
ExecStart=/usr/bin/dotnet /home/huw/snitz/SnitzForum.dll --urls "http://*:5001"
# to query logs using journalctl, set a logical name here
SyslogIdentifier=SnitzForum

# Use your username to keep things simple, for production scenario's I recommend a dedicated user/group.
# If you pick a different user, make sure dotnet and all permissions are set correctly to run the app.
# To update permissions, use 'chown yourusername -R /srv/AspNetSite' to take ownership of the folder and files,
#       Use 'chmod +x /srv/AspNetSite/AspNetSite' to allow execution of the executable file.
User=huw

# ensure the service restarts after crashing
Restart=always
# amount of time to wait before restarting the service
RestartSec=5

# copied from dotnet documentation at
# https://docs.microsoft.com/en-us/aspnet/core/host-and-deploy/linux-nginx
KillSignal=SIGINT
Environment=ASPNETCORE_ENVIRONMENT=Production
Environment=DOTNET_PRINT_TELEMETRY_MESSAGE=false

[Install]
WantedBy=multi-user.target
I changed the WorkingDirectory to the folder where my published site is located, then the arguments on ExecStart specify that location again plus the name of my dll. You'll note that I added a --urls option, this is to change the default port number from 5000 to 5001. Knowing that this works, I can run multiple sites on this Pi.
Finally, I changed the SyslogIdentifier and the User to be my username.
Now I can copy this service definition to where the Pi expects it, start my service and enable it to auto run:
sudo cp SnitzForum.service /etc/systemd/system/SnitzForum.service
sudo systemctl daemon-reload && sudo systemctl start SnitzForum
sudo systemctl enable SnitzForum
I figured I should probably do another "curl" command to see if it works, and if it doesn't then I can look at journalctl to figure out with what's being logged as going wrong. In my case everything was good.
Accessing it using a public domain name
Okay, the last piece of the puzzle! I already have a Pangolin server setup to access my internal systems, but you could also use CloudFlare tunnels for this.
On my Pangolin server, I simply added a new resource called snitz using my domain 'themediawizards.co.uk', Pangolin takes care of creating SSL certificates etc. I just had to point it at my local server address where the forum is running, in this case http://192.168.0.19:5001
I can now access the forum using https://snitz.themediawizards.co.uk ![]()
MariaDb
HuwR
Forum AdministratorInstalling the MariaDB Database Server
Let’s make your new server more usable by installing MariaDB on it:
sudo apt install mariadb-serverIt cannot get easier than that! A SQL client is included with the server installation, so you can connect to the database and check that it is working:
sudo mariadb
Try running a “Hello, World” kind of query there:
Nice. Before we leave the client, create a new database (more on this later) and a user for it. It’s a good practice to not use the root user when consuming the database from your applications. Here’s what you need to execute:
CREATE DATABASE SnitzForums;

CREATE USER 'user'@'%' IDENTIFIED BY 'Password123!';

GRANT ALL PRIVILEGES ON SnitzForums.* TO 'user'@'%';
Now you can leave the SQL client:
quit
We’ll connect remotely to the database using the above user later.
Securing the Database Server
You can use the database in its current state, but it’s always a good idea to secure the server. MariaDB includes a tool that easies this process:
sudo mariadb-secure-installation
You’ll be prompted with the root password which by default is empty, so just press enter. The tool asks you questions as you go. Feel free to configure your database server as you wish. For reference, here’s how I answered the questions:
NOTE: RUNNING ALL PARTS OF THIS SCRIPT IS RECOMMENDED FOR ALL MariaDB
      SERVERS IN PRODUCTION USE!  PLEASE READ EACH STEP CAREFULLY!

In order to log into MariaDB to secure it, we'll need the current
password for the root user. If you've just installed MariaDB, and
haven't set the root password yet, you should just press enter here.

Enter current password for root (enter for none):
OK, successfully used password, moving on...

Setting the root password or using the unix_socket ensures that nobody
can log into the MariaDB root user without the proper authorisation.

You already have your root account protected, so you can safely answer 'n'.

Switch to unix_socket authentication [Y/n] n
 ... skipping.

You already have your root account protected, so you can safely answer 'n'.

Change the root password? [Y/n] Y
New password:
Re-enter new password:
Password updated successfully!
Reloading privilege tables..
 ... Success!


By default, a MariaDB installation has an anonymous user, allowing anyone
to log into MariaDB without having to have a user account created for
them.  This is intended only for testing, and to make the installation
go a bit smoother.  You should remove them before moving into a
production environment.

Remove anonymous users? [Y/n] Y
 ... Success!

Normally, root should only be allowed to connect from 'localhost'.  This
ensures that someone cannot guess at the root password from the network.

Disallow root login remotely? [Y/n] Y
 ... Success!

By default, MariaDB comes with a database named 'test' that anyone can
access.  This is also intended only for testing, and should be removed
before moving into a production environment.

Remove test database and access to it? [Y/n] Y
 - Dropping test database...
 ... Success!
 - Removing privileges on test database...
 ... Success!

Reloading the privilege tables will ensure that all changes made so far
will take effect immediately.

Reload privilege tables now? [Y/n] Y
 ... Success!

Cleaning up...

All done!  If you've completed all of the above steps, your MariaDB
installation should now be secure.

Thanks for using MariaDB!
Enabling Remote Database Access
Since you probably want to connect to this database remotely from your working computer or even another Raspberry Pi, you’ll have to enable remote access. Edit the following file using nano or vi:
sudo nano /etc/mysql/mariadb.conf.d/50-server.cnf
Comment out the following line by adding a hash (#) character at the beginning as shown:
#bind-address = 127.0.0.1That’s it. Save the changes, exit the text editor, and leave the machine by ending the SSH session:
exitNow you are back into your working computer. If you happen to have the MariaDB client installed on your computer, you can try the remote connection right away (skip this if you don’t have the tool, or install it):
mariadb -h raspi01.local -u user -pIf you see Welcome to the MariaDB monitor, your database is ready!